- Xhorse VVDI Mini Key Tool Remote Key Programmer Support IOS and Android Global Version
- Transparent practice 7 pin lock padlock + 12pcs/set Lock picks Tools locksmith + 5pcs credit card lock pick set
- Transparent Cutaway 15Piece Lock Picks Set Padlock Practice Lock With Locksmith Tools for Lock Pick Training Trainer Practice
- High quality locksmith tool HU58 2 in 1 Genuine LiShi Locksmith Professional Car/Auto Repair Tools
- Ul050 Blank Key House Door Key Blanks Keys Wholesale
- 3 Buttons 315Mhz Remote Flip Key For Fiat 500 / Dodge (Delphi BSI)
- Mito 3 Button Flip Pcf7946 433mhz Delphi BSI
- Giulietta 3Btn Flip Pcf7946 433mhz M.Marelli
- Original XTOOL X300 Plus X300+ Auto Key Programmer with EEPROM Adapter
- DegeTools Winbag Pump Air Bag Wedge Tools,for windows install
How to Install a Lockset
by Walter Curtis
Once you've hung a new door, you need to fit it with a lockset.
What You'll Need
Here are the tools you'll want to have on hand to install a lockset:
Lockset
Tape
Pencil
Power drill with hole-saw attachment
Combination square
Sandpaper
Chisel
Screwdriver
Some doors come predrilled for standard-size locksets. Other doors require you to drill the holes yourself, using a template provided by the lock manufacturer. With any door, you need to cut mortises, or holes, in the door edge for the lockset and in the frame for the strike plate that engages the lock's bolt.
Here's how to install a lockset:
Step 1: Wrap the paper or cardboard template that comes with the new lockset around the edge of the door according to manufacturer's instructions. If necessary, use tape to secure the template. Template will be used to locate two holes: one hole for lock cylinder and the other for edge of door for bolt. Mark centers for these two holes on door.
Step 2: Use a power drill with hole-saw attachment to drill hole the size specified for lock cylinder. Be careful not to damage the veneer on the opposite side of door. When you see the point of the drill coming through, stop and finish boring from other side.
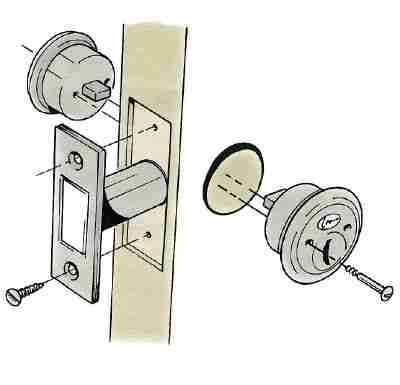
Install the outside lock cylinder so the stems or connecting bar
fits into the bolt assembly.
Step 3: Drill a hole the appropriate size for the bolt into the edge of door until you reach the cylinder hole. Use the combination square against the edge of the door and the drill bit to keep the bit at a right angle to the door. Smooth edges of holes with sandpaper.
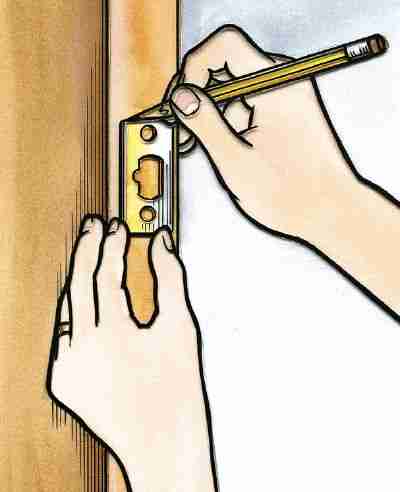
Step 4: Insert the bolt into the hole, and place the bolt plate in position over it. Trace the bolt plate's outline on the edge of door. Follow the manufacturer's instructions to remove the bolt and mortise edge for the bolt plate so it will be flush with the surface.
Step 5: Use a chisel to cut the mortise. Insert the bolt and plate in the mortise, and drill the pilot holes for mounting screws. Install the screws to secure the bolt in place.
Step 6: Insert the outside lock cylinder so the stems or connecting bar fits into the bolt assembly. Attach the interior lock cylinder, and secure it with the screws.
Insert the bolt assembly and trace its outline over the edge of the door.
Remove excess wood to mount the assembly.
Step 7: Locate the proper spot for the strike plate on the jamb, and drill the proper-size hole in the jamb. Using the strike plate as a pattern, mark the jamb for mortising, and cut the mortise. Install the strike plate with screws so it fits flush with the jamb.
